

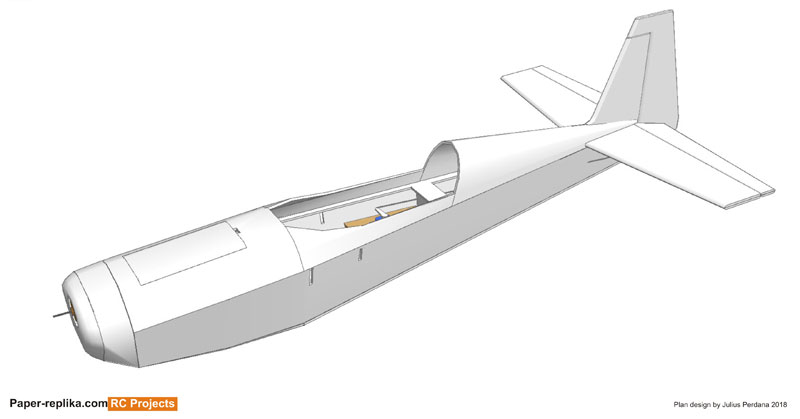
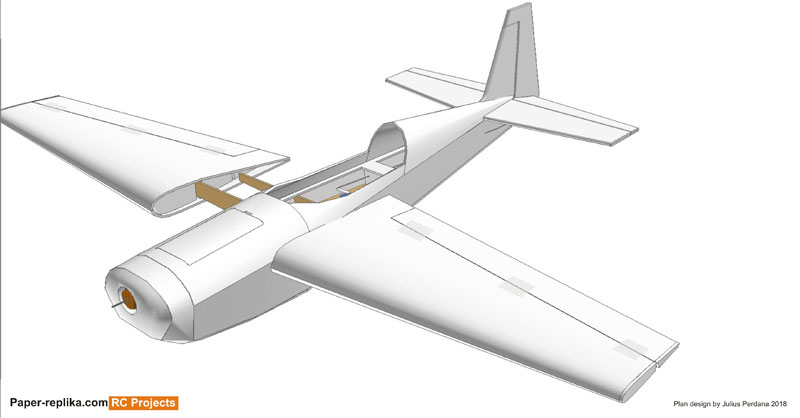
This new category originally was named AR Drone 2 Custom Hull. Starts from now I change it to "RC Projects". Just like the name this category will hosted many RC (Radio Controlled) projects from aircraft, boat, car or even robot, with different kind of materials not just paper, can be foam, wood, plywood, plastic, etc. I begin with this RC plane Extra 300. I use 2 kind of materials which is 3 and 5 mm foam sheet, it's familiar with the name depron foam, but in where I live it is called "polyfoam". The 2nd material is 3 mm and 9 mm plywood. The design process of this foamy RC plane is pretty similar from designing a papermodel or papercraft. The build process is also similar.
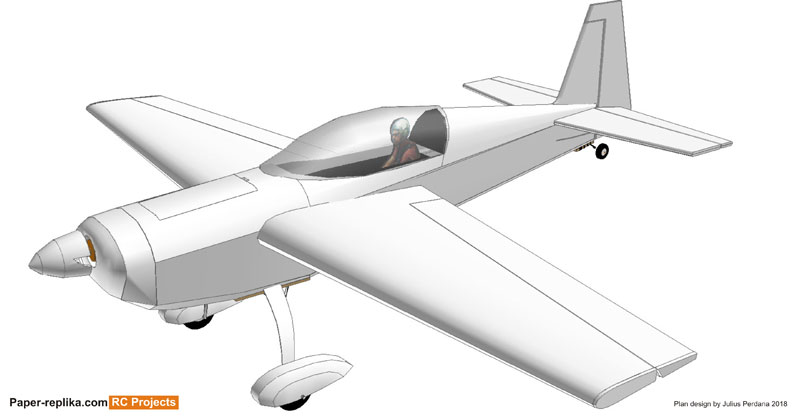
I choose Extra 300 because I enjoy flying this type of plane when I borrow my friend's plane and also this aerobatic plane has many fans. I also choose 900 mm wingspan to make it pretty compact to carry around to flying field or wherever you want to fly it. The flying weight is around 700 gram with 3S Lipo battery 2200 mAh and 600 with 1300 or 1000 mAh battery. I installed Turnigy 2831 1000kv with 9x6 propeller and 50A ESC. This motor can be fitted with 30A ESC. It needs 4 servos for ailerons, rudder and elevators. I use 60% Expo on each flight controls.

It fly great with big 3S 2200 mAh but even enjoyable with smaller 1300 mAh. Because its wheel pants you need to land it on smooth runway or short grass otherwise it may flipped over. Add little power on landing, don't cut the motor yet, it may stall. The CG (Center of Gravity) is around 6 cm from the leading edge start from the wing root. Always make the plane a bit nose heavy on the CG the maiden flight then you can adjust it after flight evaluation. In my experience you also need to trim a bit elevator to make it able to do straight rolls.

To make your build experience more clear and enjoyable I also made a build tutorial video on Youtube
. This is my first tutorial video, I will increase the quality of the lighting in the next video if I had good feedbacks on this one. This is part 1 but quite cover almost whole tricky technique that needed to build this plane. The next part will cover about preparing landing gear, mold clear canopy and others.

BUILD INSTRUCTIONS :

Assembly the fuselage with part 1,2 and 33. And then close the bottom with part 30 and 31. Place firewall (3) on the front and then middle former (7). Put rear former (6) 16.8 cm from middle former. Put part 4 on the floor in front off part 7 and then lock it with part 5 exactly in the middle of it.

Please use this Extra 300 plans for personal use only, Do not use for any commercial purpose.
By downloading the plans you have agree to follow the above terms.
Download Extra 300 - 900 mm plans
Download Extra 300 - 900 mm Mazda decals
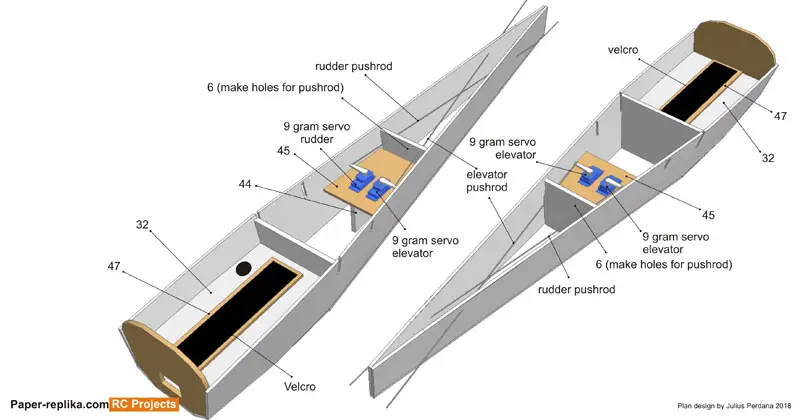
Put part 32 on its place, sand and cut it if it not fit well. Make a hole on the rear right of it for ESC sockets to come out. Put part 47 and glue a velcro strip on it. Those part will be a platform deck for Lipo battery and RX. Put pat 47 and then put servo platform deck (45). Glue 2 units of 9 gram servo inside its 2 holes. Make two holes on part 6 to make way for two pushrods.
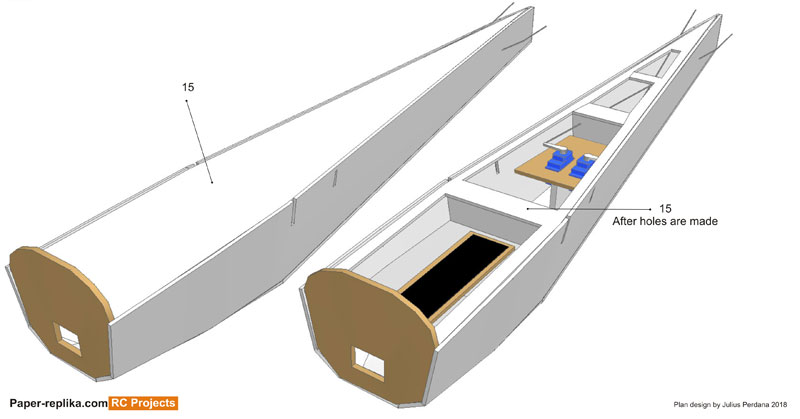
Put part 15 first on its place like the picture above then cut holes respectively like shown in the picture above. You can use cutting knife or solder. Warning, you will broke your solder needle if it use for melting foam/ plastic. So I use a broken solder, or solder that solely purposed just to make holes on foam.
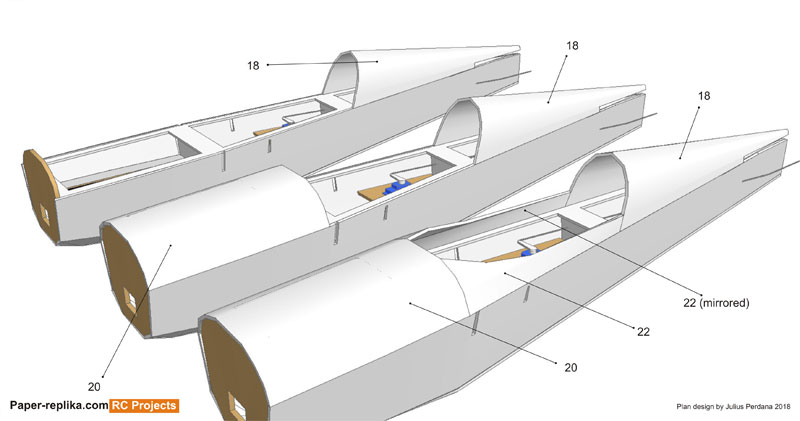
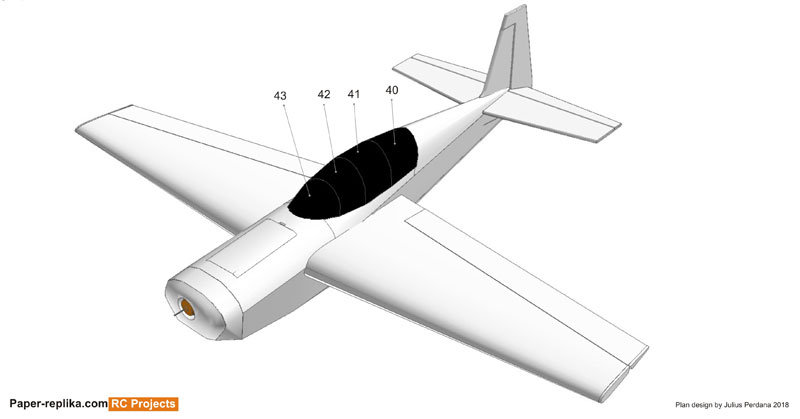
Bend and shape part 18 to become half circle shaped. You can see the tutorial video on how to do it. Then put it on the back part of the fuselage. Then followed by part 20. Don't cut the hatch door yet. Finally put both part 22 on the middle. Make sure all parts are already bended before attaching to the fuselage.
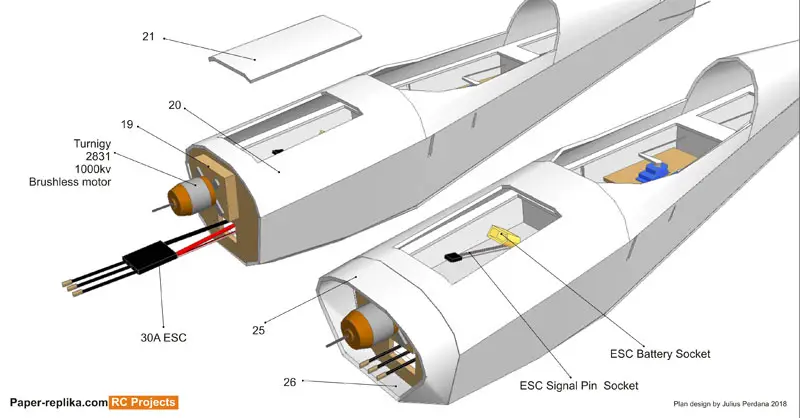
Cut the hatch door on part 20. Attach part 19 which made of 9 mm plywood. Install the motor, I use Turnigy 2831 1000kv brushless motor. Insert ESC into a hole on firewall, pull up signal and battery cables through a hole on battery platform deck. Connect ESC to the motor and check motor rotation with a servo tester and a lipo battery. If it correct, continue by attaching cowl parts (25 and 26).
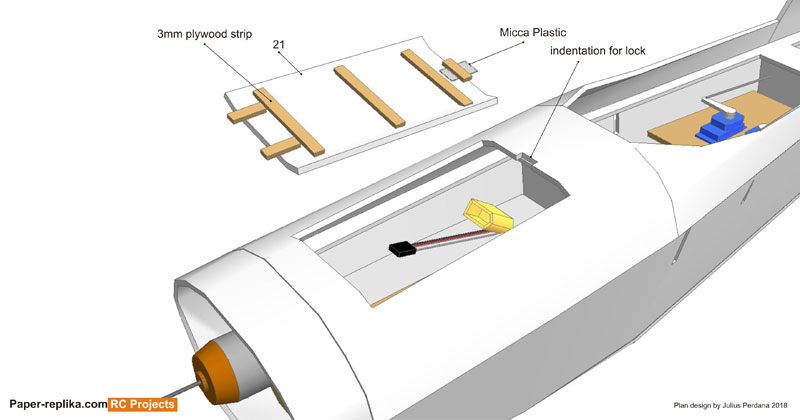
Reinforce the hatch door with plywood strips like shown on the picture above. And add mica plastic to be its notch lock. See video tutorial on how to make the hatch door lock. Also make an indentation for the lock, also see the detail on how to do it on video tutorial.
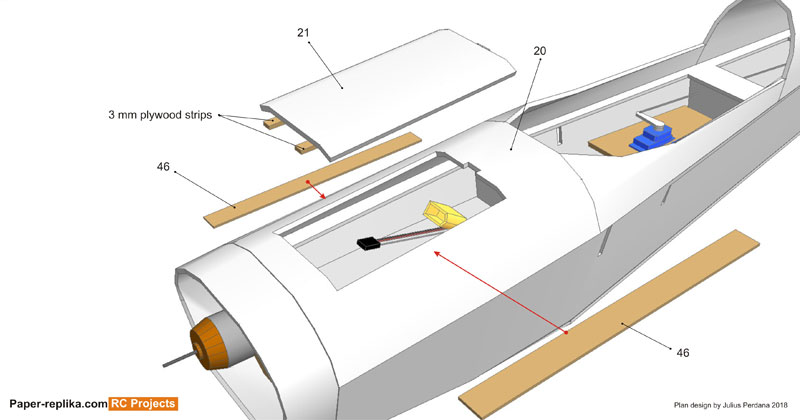
Reinforce part the battery hole with plywood strips (part 46). Place them on inside of the hole edges.

Close the cowl with 2 copies of part 27. Stack them together then glue it to the cowl. When it already set, carve it and sand it to become smooth.
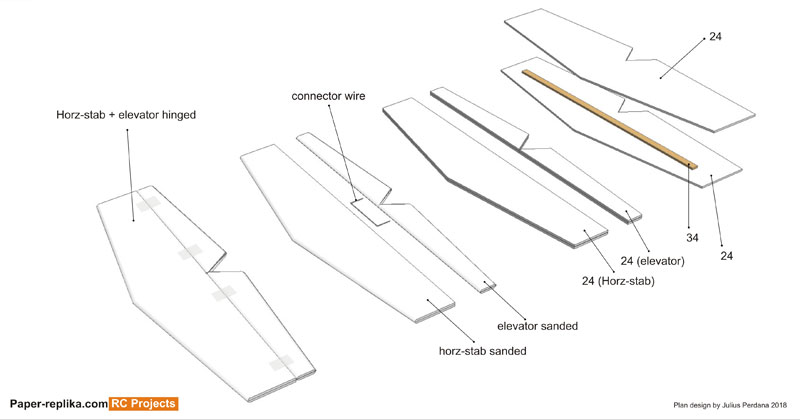
Make a horizontal stabilizer with sandwiching a plywood spar in between 2 copies of part 24. Cut both elevators, connect them with a steel wire. And then sand all the edges to became smooth. Hinge the elevators with packing tape, you need to cover them first before hinge them. You can use packing tape to cover the plane, I use Oracal 651 vinyl sticker.
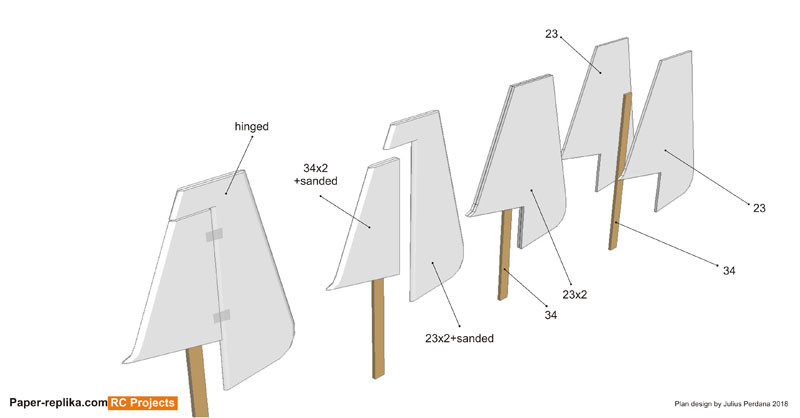
The similar way also go to vertical stabilizer. Insert a spar in between part 23. Cut the rudder, sand the edges, cover them and finally make hinges.
Cover the fuselage with packing tape or vinyl sticker, also cover both stabilizers. Attach horizontal stabilizer first, make sure it is center and perfectly leveled. And the insert the vertical stabilizer, you may need to make holes on back of the fuselage and on vertical stab to make way for vertical stab spar to make through to the bottom inside the fuselage. Make sure vertical stabilizer is perfectly center and 90 degree angled then fix it with glue. Also attach rudder hinge to the fuselage.
Please use this Extra 300 plans for personal use only, Do not use for any commercial purpose.
By downloading the plans you have agree to follow the above terms.
Download Extra 300 - 900 mm plans
Download Extra 300 - 900 mm Mazda decals
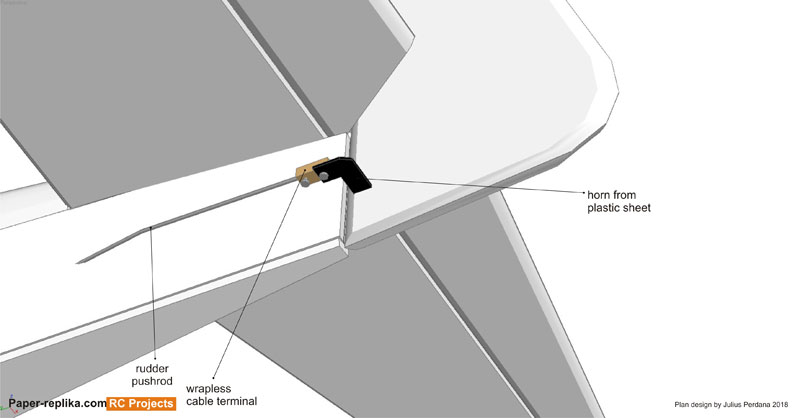
Cut a slit with cutting knife on the rudder and on that place as shown in the picture above. Add glue the bottom of the horn and insert it into the rudder slit that we made earlier. Install pushrod stopper or DIY with cable terminal.
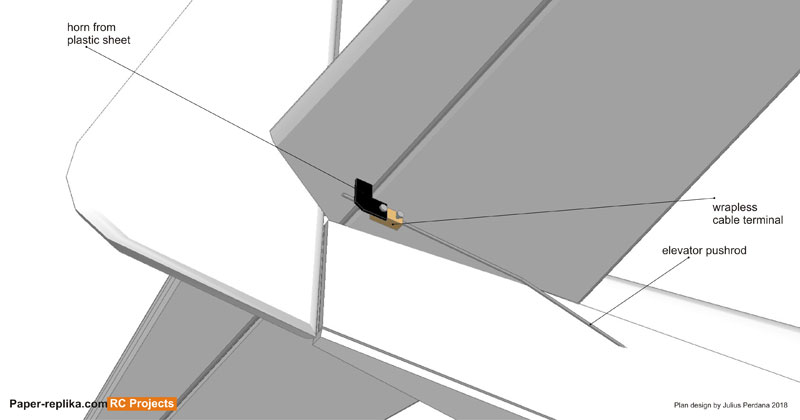
Similar way on the elevators. Cut a slit with cutting knife on the right elevators and on that place as shown in the picture above. Add glue the bottom of the horn and insert it into the elevator slit that we made earlier. Install pushrod stopper or DIY with cable terminal.
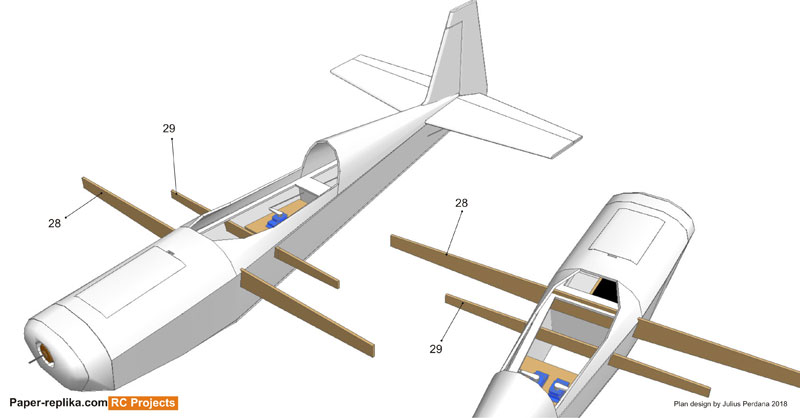
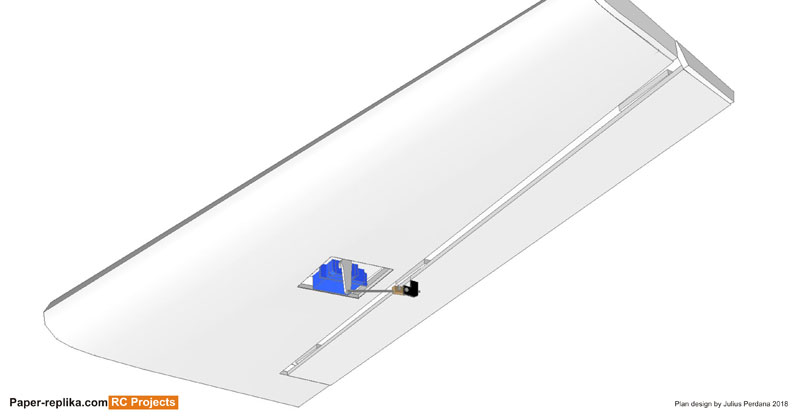
Insert 2 spars (28 & 29) through the fuselage. Also cut some part of part 15 (middle deck) to make way for front spar. Make sure all are centered before lock them with glue from outside.
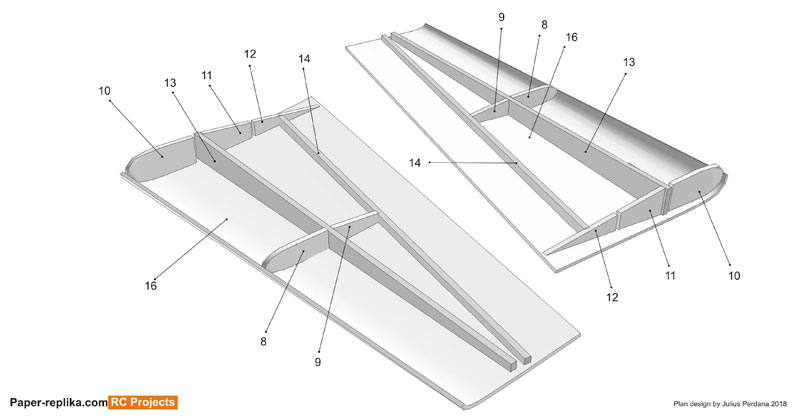
Bend and shape all 4 wing parts (16 & 17 and each mirrored copies). See how to shape the wing part on the tutorial video. Place and glue 2 spars (13 & 14) in their places. Put wing root rib parts (10,11 and 12). Watch the gap between ribs to make way for 2 plywood spars that we made earlier. Lastly put ribs 8 & 9 in the middle of wing.
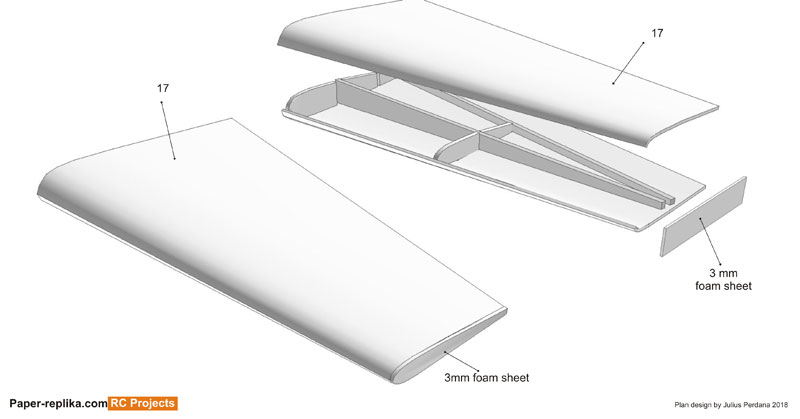
Close the wing with top part (17) by glueing the leading edge first. Also close the wing tip with 3 mm foam sheet. See tutorial video. Repeat the process on the other wing.
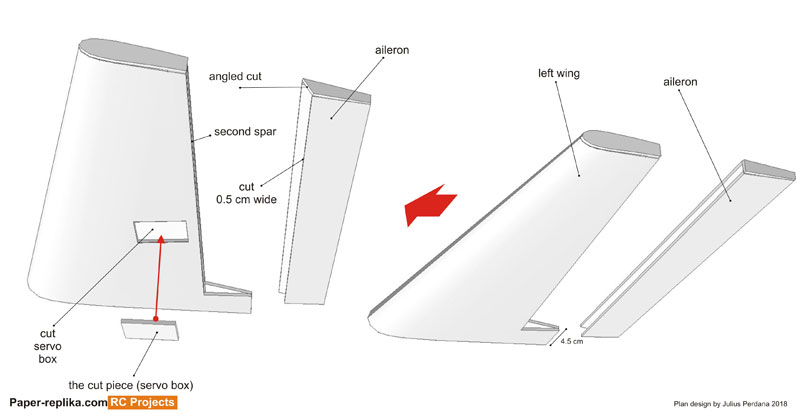
Cut the aileron (see tutorial video). Aileron starts right on the back of the second spar. I ends 4.5 cm from the wing root. Cut the servo box on the bottom side of the wing, glue the cut piece from the servo box, inside the servo box, on its ceiling. Cut bottom side of the aileron 0.5 cm wide. Angled cut the wing tip too.
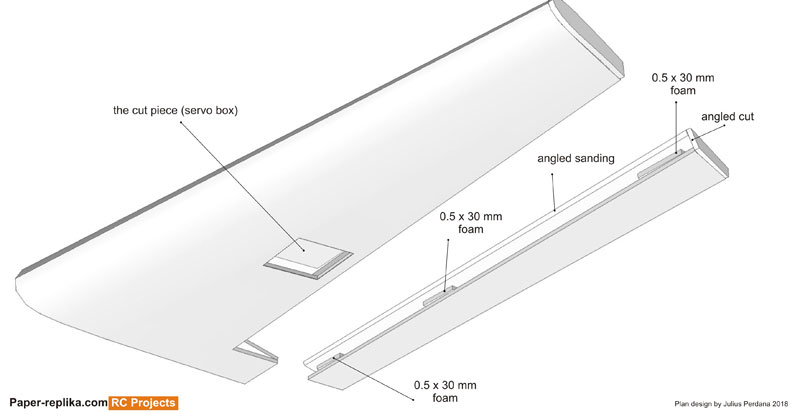
make 3 foam strips, 0.5 x 3 cm. And insert them in between the two aileron sides. One right in front of the servo box and two in each ends. Finally angled sand the upper edges.
Cover both wings with packing tape of vinyl sticker, add hinges for ailerons. Install a 9 gram servo as shown in the picture above. Make a hole of the wing root rib for servo cable to get through. You also need a Y servo extension to connect both aileron servos together. Put horn and pushrod like the picture above
Apply glue both plywood spars with styrofoam glue, so they will not cured fast. Make a hole on the fuselage inside the wing fitting for servo cable to get through. Insert servo cable from the wing to that hole, connect with Y cable inside the fuselage and connect to RX in the front. And then apply glue on the edge of the wing root and them secure the wing to fuselage, repeat that steps on the other wing.
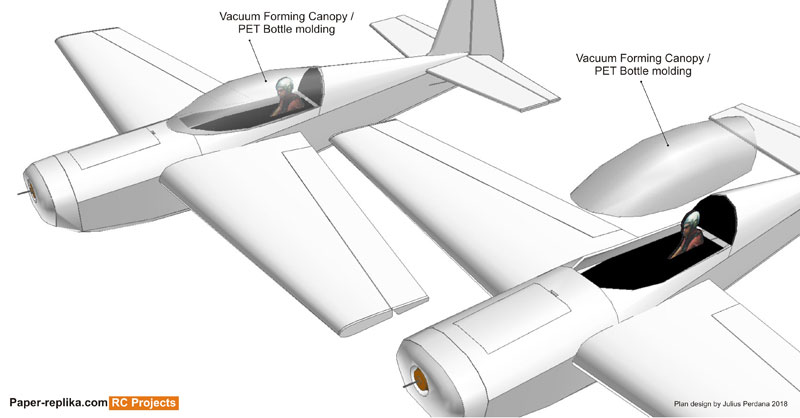
On the plans you can use opaque canopy from foam like on the picture above. Paint black or dark grey for scale looks.
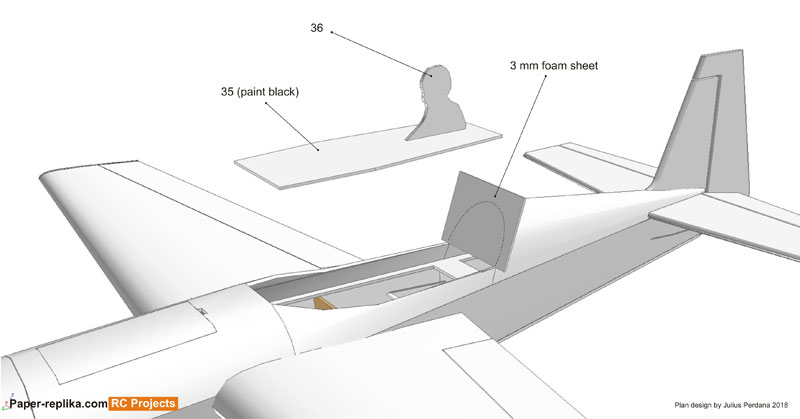
Or you can use clear canopy by using vacuum forming or PET bottle molding method. I will cover on how to do it on the next tutorial video on my Youtube channel. Put cockpit deck (35) paint it black, put the 2D pilot (36) on the deck. Trace the fuselage back edge with 3 mm foam and cut it and paint it black too.
Please use this Extra 300 plans for personal use only, Do not use for any commercial purpose.
By downloading the plans you have agree to follow the above terms.
Download Extra 300 - 900 mm plans
Download Extra 300 - 900 mm Mazda decals
Put the clear canopy and glue it with styrofoam glue like UHU Por, don't use hot glue or CA glue, it will be a mess!
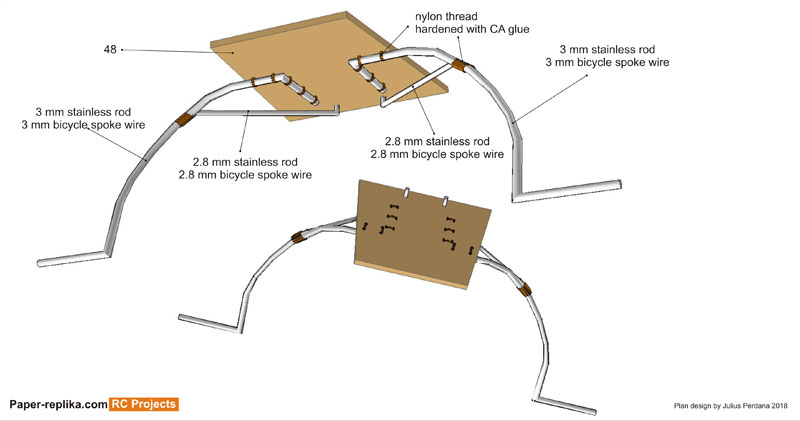
This is how the landing gear is assembled. You can use 3 mm plywood as a base. 3 mm and 2.8 mm stainless steel rods. You need to refer to the plans for the exact dimension. Bend the rods and assembly them like the picture above. I use nylon thread to hold steel to steel or steel to plywood. And finally hardened the thread with CA glue.
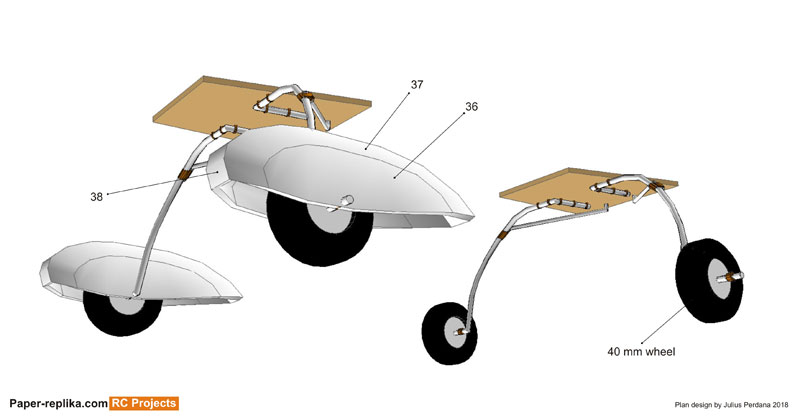
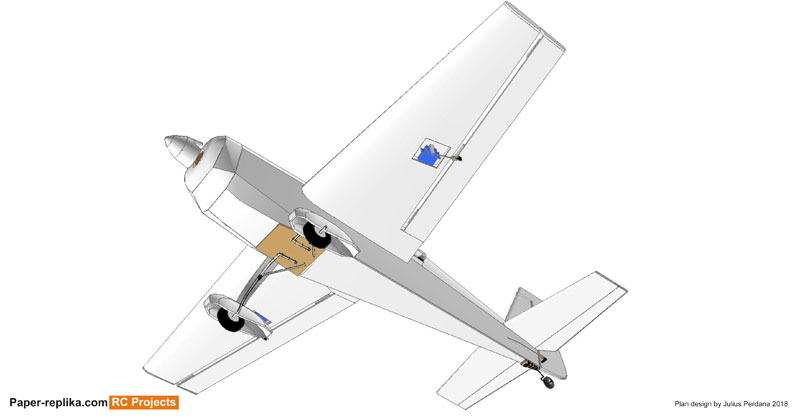
Use 40 mm wheel. Place the wheels on rods, secure them. Add both wheel pants (36,37 and 38) to the wheel shafts and secured them with hot glue.
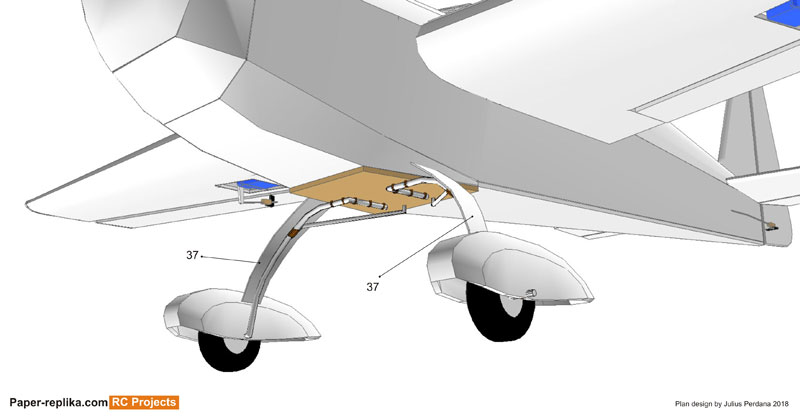
Install landing gear with hot glue. Cover landing gear struts with mica plastic or you can use 3 mm foam sheet using part 37 as template.
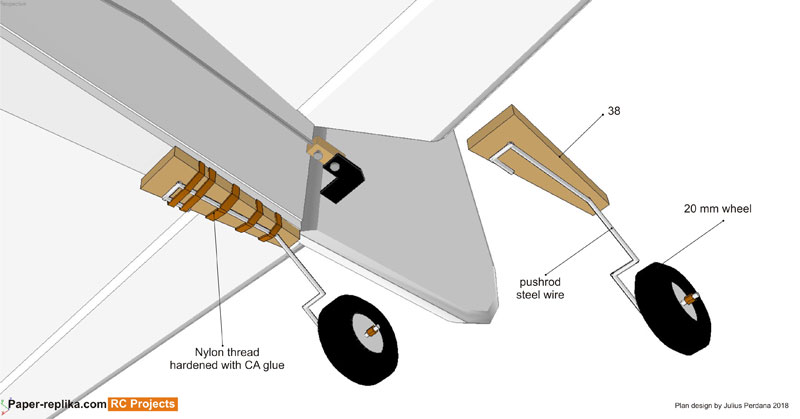
Use 3 mm plywood as a rear landing gear base (38). Make strut with pushrod wire as in the plans. Wrap the wire and the plywood base with nylon thread and hardened it with CA glue. Use 20 mm wheel. Finally install the rear landing gear with hot glue.
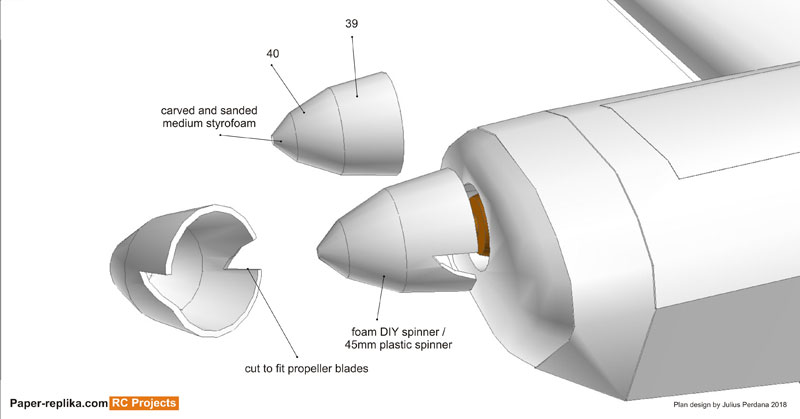
I recommend to use 45 mm plastic spinner or you can make it yourself with foam like in the picture above. It stayed in 3 flights until it flew away on the 4th flight, but perhaps yours can hold longer, LOL.
Please use this Extra 300 plans for personal use only, Do not use for any commercial purpose.
By downloading the plans you have agree to follow the above terms.
Download Extra 300 - 900 mm plans
Download Extra 300 - 900 mm Mazda decals