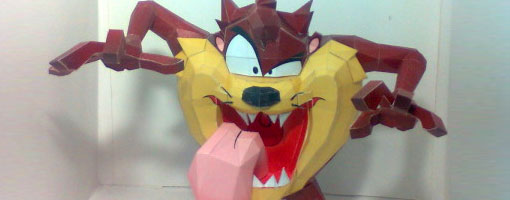
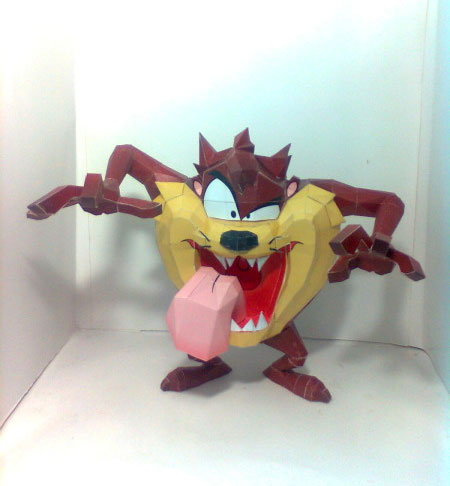
optimus prime is a character in the Transformers universe. He is the leader of the Autobots, a faction of heroic Transformers from the planet Cybertron who wage their battles against the evil forces of his brother's group the Decepticons for control of their homeworld, and by extension, peace in the universe. optimus-prime is depicted as a heroic, brave and compassionate character who puts all his talent to use to improve the world around him. Optimus has a strong sense of justice and righteousness, and has dedicated himself to the protection of all life, particularly the inhabitants of Earth; he will battle his foes with unyielding resolve to uphold this belief. [Wikipedia]


DISCLAIMER : Paper-replika is not affiliated or representation of Dreamworks SKG or Hasbro. Paper-replika is a nonprofit un official fan & hobby site. This is a fan made model,
DO NOT USE FOR ANY COMMERCIAL PURPOSES, PLEASE USE
FOR PERSONAL USE ONLY.
All trademarks mentioned is belong to its respective
owners - Hasbro - Dreamworks SKG
Visit : www.transformersmovie.com
The original optimus prime transforms into a cab over semi truck. The truck's cab transforms into the robot mode of Prime himself, with vast strength and armed with a laser rifle. Contained within his chest is the mystic talisman known as the Autobot Matrix of Leadership (or Creation Matrix, depending on the continuity), carried by all Autobot leaders and passed down through the ages. The comic book continuities tend to claim that Optimus' direct predecessor as Prime and thus bearer of the Matrix was Sentinel Prime, a fact which is part of the Dreamwave comics canon. In the cartoon continuity, it is unknown who Optimus inherited the talisman from, as he is already named as a Prime when Alpha Trion rebuilds him from his former self, which appears to indicate that Alpha Trion may have given Prime the Matrix at that point in time just after the transformation of Orion Pax into optimus-prime. [Wikipedia]

This change is depicted in the episode War Dawn. The truck's trailer disconnects and transforms into the Combat Deck, a mobile battle-station/command headquarters with an "Auto-Launcher" robot armed with assorted artillery and beam weapons. It can also serve as a radio antenna for battlefield communications between the Autobots. The Combat Deck can launch Prime's third component, Roller, a mobile scout buggy that can easily slip behind enemy lines. Optimus' senses are tied into Roller's, and can perceive what Roller does. Injury to one component is felt by each of the others, and while Prime could survive the destruction of either, despite the slight degree of autonomy they possess, the Combat Deck and Roller would not be able to survive without him. [Wikipedia]


You must agree on Document License agreement page first, choose agree on the radio button then you will proceed
Download
Open the PDF file with Adobe Acrobat (recommended software)
PDF security password : paper-replika.com
Optimus Prime Papercraft Part 1 templates
-
2010-05-02 05:05:24 |Registered| Gianluca Magrini - super model......is it possible to have a little help? down,under the mouth there are three parts: no 28, 29 and 30...I don't know how to attach them to the rest of the head. where is the correct place to glue part no. 33? thanks a lot for your works.. ZioDarK
-
2010-05-15 06:07:42 |Registered| neilCan someone help me with parts 13, 14, 16 and 17. Having trouble seeing how they fit. Cheers
-
2010-07-19 21:06:35 |Registered| iBasti - re:[quote=neil]Can someone help me with parts 13, 14, 16 and 17. Having trouble seeing how they fit. Cheers[/quote] Same problem here.. Can someone help?! Thanks
-
2010-08-04 00:48:00 |Registered| Eric KristiaI think it should be attached on part no. 34.. So, in the bottom of part 35, it's part 34, then, you should could attach part no.28,29,30.. hope useful..
and sorry if it's not right, since i've just started to make this..
-
2010-09-17 23:13:23 |Registered| Lourivaloi gente não consigo fazer o download dos moldes para imprimir do optimus disse q a senha esta incorreta poderiam mandar a senha para mim ou me explicar o q ta acontecendo!
-
2009-07-02 13:08:59 |Registered| Anwar - ExcellentA very unique papercraft, lots of details... love it!
-
2009-07-02 13:36:43 |Registered| Blackhorsie - ..the life is beautiful...I love it :grin , I love it, :grin , I love it, :grin ,I love it, :grin ,I love it, :grin I love it, :grin You`re gona submit the instructions ? Congratulations, GREAT work! WE want to see more!
-
2009-07-02 15:21:36 |Registered| Chris Cauble - AWESOME!!!:grin Wow, that is amazing, and the template surprisingly doesn't look insanely difficult for me to build. I love detail, but shy away from the massive projects, but this one is a good balance. Great job!!! And thanks so much for sharing it with us. YOU ROCK!!!
-
2009-07-03 01:47:13 |Registered| Biro Tamas - Thank you!The scale is ok, because who wants to make a smaller one ( like myself ), can easily rescale on a smaller version, but upscaling a model is not an easy task. I can't wait to see your Optimus Prime near Claudio's Bumblebee on my desk. Keep up the good work and thank you!
-
2009-07-03 02:02:44 |Registered| Ryan - is it fits my head?wow, what a great job! um... I'm wondering if it fits my head :p
-
2009-07-03 03:06:48 |Registered| Mel Stoll - Great JobAbout the rescale poll, which scale is it now? The same 1:12 of Carlos' Bumblebee? It would be great have them both on the same scale, of course, Optimus will be twice the size anyway. Have you consider have both, full and bust models? But overall, FANTASTIC job, I'm finishing a simple model and Optimus is the next on my list. Thanks.
-
2009-07-03 08:52:29 |Registered| Chris - This RAWKSI've decided to make Carlos' BumbleBee first, but this guy is next. Judging by your poll, with the full bot measuring some 130 cm, then he should be the exact same scale as BumbleBee. I can't wait to have both of these guys sitting on my desk! Awesome job, and pu-LEEZE do the rest of the bot :grin
-
2009-07-03 09:10:45 |Registered| neil - Just awesome!!Im spechless... Ive been waiting for ages for someone to do a paper model of move prime. I never dreamed that if someone did it would look this awesome! I cant wait to have a go at this, an infinity of thank you's too you. In fact thank you just isnt enough, need someone to do laundry, ironing, fan your feet....
-
2009-07-04 07:40:25 |Registered| Andy - wooooowwwwwwwmuchas gracias por el modelo amigo sigue asi en verdad esta super saludos desde mexico
thank you very much for the model friend
greetings from mexico. sorry my english jejeje
your friend Ikarishin
-
2009-07-04 19:48:39 |Registered| Guntur Santosa - just try itwahhhhh...bru kpalanya aja kynya dah rumit gt yak...........but,its worth to try.........
-
2009-07-06 06:23:55 |Registered| Rafael Ivan - yeiotro mexicano que le interesa el papercraft yei another mexican that have some interest in the papercraft adios bye :grin
-
2009-07-06 06:23:56 |Registered| Rafael Ivan - yeiotro mexicano que le interesa el papercraft yei another mexican that have some interest in the papercraft adios bye :grin :grin :grin
-
2009-07-07 19:43:05 |Registered| Kurniadi Widodo - Assembly QuestionHi Julius, thanks for the great looking model! I am currently building this model and I have a question: I can't seem to find where to put part 34 (his lower mouth piece) in the assembly instruction, and I can't figure out how to attach it to part 35 either (especially the front part of it)... Could you provide a picture from below, preferably before the parts 28-29-30 are attached. Thanks in advance!
-
2009-07-09 20:40:16 |Registered| steve - piece 34i was also wondering the same thing. piece 34 looks the right shape to fit under his chin but i couldnt seem to stretch 35 that far
-
2009-07-11 20:20:58 |Registered| Kevin Chapman - re:assembly questionhi folks. I had trouble with this piece too. It took me quite a while to figure it out, but to get it you actually have to fold a bit of prime's faceplate back to go along the contours of piece 34. I'd post a pic, but my email is being stupid. I talked with Jules and he's almost done writing up instructions to attach pieces 34 and 35.
-
2009-07-19 11:44:51 |Registered| tony martinez - incomplete piece # 38this is an awesome piece of art. i am having a problem though. on page two of the instructions it says to add pieces 38, 39, 40 and 41 which makes the middle top part of the helmet. well, piece 38 doesn't seem to have a top to it. it's the blue middle piece and when it's folded as the directions state, the top is completely open! i also cannot find another piece that seems to fit it! has this papercraft actually been completed by anyone? what am i missing here?
-
2009-07-20 02:23:48 |Registered| John - having a problem toohi, did u find out what kind of piece have to get on top of the part 38? im facing the same problem like u, its completly open, cant find the right piece though....
-
2009-07-20 06:18:56 |Registered| Kurniadi Widodo - attach it to piece 49The pieces 39-40-41-42 are attached to piece 49, which is then placed on top of piece 38. Hope that helps, I completed mine.

-
2009-07-20 08:18:47 |Registered| orionfwd - Animation GIF present thisI made animation gif image to present this
http://www.flickr.com/photos/26538312@N08/3735247973/
-
2009-07-22 23:20:02 |Registered| Daniel - Tnak youThank you wid! I had the same problem but now I'm able to work on it again.
-
2009-07-23 03:13:19 |Registered| Gordon - about this two partsi can't combined this two parts together how can i do? [img]http://images.plurk.com/3170135_c90330345732ad8aa7153ae055011a8a.jpg[/img] [img]http://images.plurk.com/3170135_b43967036879c12a5bb38743423ab76c.jpg[/img]
-
2009-07-30 09:30:38 |Registered| Tim - heres some helpyo i just got to this part yesterday and decided to help you if you still need it http://i140.photobucket.com/albums/r38/timsostoopid/optimushelp.jpg?t=1248895744 fold along the red lines.. and it should glue straight on ... and those tabs circled in yellow .. glue them to the underside of the other circled yellow areas.. .. this should help some.
-
2009-07-30 09:34:52 |Registered| Tim - helphttp://i140.photobucket.com/albums/r38/timsostoopid/optimushelp.jpg?t=1248895744 sorry here's the fixed link
-
2009-07-30 09:40:01 |Registered| Tim - stupid linkok so you have to manually take out the space before "albums" and the space before "optimushelp" and then it should work..
-
2009-08-15 03:17:40 |Registered| erebos - Solution PicturesSo here is the solution for you Guys: Front: [img]http://img228.imageshack.us/img228/9466/p1060810.jpg[/img] Top: [img]http://img232.imageshack.us/img232/5236/p1060809.jpg[/img] Template: [img]http://img197.imageshack.us/img197/7572/unbenannt1bsa.jpg[/img]
-
2009-08-15 03:21:50 |Registered| erebos - sorryhere are the links: Top: http://img232.imageshack.us/img232/5236/p1060809.jpg Front: http://img228.imageshack.us/img228/9466/p1060810.jpg Template: http://img197.imageshack.us/img197/7572/unbenannt1bsa.jpg
-
2009-08-21 00:20:41 |Registered| Gordon - number 16 and 17i have a question how do i combined number 16 and 17 together? i don't understand thie instruction picture. :cry
-
2009-08-28 16:46:12 |Registered| Christian - Page not FoundThe Page for that Image has gone missing!
-
2009-09-06 18:22:54 |Registered| jose - type of papercan this model be made with 110lb card stock paper
-
2009-09-07 07:18:16 |Registered| shen - I NEED HELP WITH THIS TOO!the picture isnt workingggg!!! can you like upload to tinypic or something? i really need help with this...
-
2009-09-20 14:26:09 |Registered| Gonzalo - transforthe last star when I can get the model to cut and fix...
-
2009-10-01 06:43:24 |Registered| Tarek - Problem with part#38this is awesome. i am having a problem though. on page two of the instructions it says to add pieces 38, 39, 40 and 41 which makes the middle top part of the helmet. well, piece 38 doesn't seem to have a top to it. it's the blue middle piece and when it's folded as the directions state, the top is completely open! is there any part missing?? can anyone assist me how to put them together??
-
2009-10-06 12:17:12 |Registered| Peter Szaszko - Problem with the chinCould anyone help me who already done with this. What parts should be on the bottom of the head ? I put together parts 28 29 30 34 & 35, but something is missing there. :? Please help !
-
2009-10-07 09:13:34 |Registered| Peter Szaszko - Problem with part#38part 49 and after that parts 39 40 41 42
-
2009-10-22 01:58:27 |Registered| jolo kahiwat - paper or cardboard?um.......should i use plane paper or should i put something hard on the paper like cardboard? :?
-
2009-11-24 15:10:14 |Registered| Richard Lewis - paper or cardboardI use card stock or photo paper. Photo paper makes the model shine, where card stock leaves a flat finish.
-
2009-12-13 00:54:00 |Registered| lim chin poh - just complete![img]http://www.facebook.com/photo.php?pid=129782&id=1771639946[/img][img]http://www.facebook.com/photo.php?pid=129784&id=1771639946&fbid=1070645144312[/img]
-
2009-12-23 07:00:30 |Registered| Hary Ibrahim - amazing !!!!:grin it is so amazing!!!! please let me know how to make a model. Do we need any program?
-
2009-12-24 21:11:11 |Registered| Sonny - Mouth PieceGreat Model, but I cannot figure out piece #34, can you show us a picture of the base of the head. How does 30,29,28 attach to the bottom of the mouth?
-
2009-12-25 08:44:45 |Registered| Peter Szaszko - Part 34The problem here is a missing folding line. [url=http://img704.imageshack.us/img704/5641/ophead34.jpg]Link Text[/url]
-
2009-12-25 08:48:20 |Registered| Peter Szaszko - Bottom of the headTwo folding lines missing from part 35, see the image for explanation. [img]http://img704.imageshack.us/img704/5641/ophead34.jpg[/img]
-
2010-02-08 19:33:35 |Registered| Mike Syfritt - Fix help for 34-35The last post helping with this part left me very confused but I finally figured it out so I thought I would post some pics to help future paper crafters. Since I can print in large format I'm making Otimus prime 4x the size. Here is the underside of the jaw for a better view. The part this is not mentioned is #34It folds in three directions. [IMG]http://img.photobucket.com/albums/v31/dragonflyer/Prime%20Paper%20craft/8f21ab37.jpg[/IMG]
-
2010-03-16 19:48:03 |Registered| Rusty Walston - fantastic model...keep 'em comin'You stated that you printed Prime in 4X scale...what kind of printer? An is the model (the basic one) printed on regular 8 1/2" x 11" or A4? What would I need to increase the scale to make 2X? Rusty
-
2010-03-22 04:22:49 |Registered| Azizan bin Yatim - Headache on Parts 13-23Hi guys, right now, I'm working on this model and I'm currently stuck on parts no 13-23 (the chin plate). I know where to put it but the problem is I don't understand how to exactly fold and glue the parts. can somebody share with me on how to tackle this parts? I will be eternally grateful. thank you! p.s.: this is the most complicated papercraft I've done so far and from the looks of it, it's definitely worth it!
-
2010-03-23 13:24:51 |Registered| Rusty Walston - ok it's my turn for a headacheI must be absolutely braindead but I'm having a really hard time seeing how parts 4 and 5 go together and attache to the model...can someone provide me with maybe a close-up on how these parts fold and are attached....pretty please?? Rusty
-
2010-03-24 15:18:31 |Registered| Azizan bin Yatim - part 5hi rusty, as I cannot upload the photos (I don't know how to), I'll try my best to explain it to you here. part 5 is the first thing you want to tackle: 1. fold the MIDDLE WHITE triangular lines with mountain folds. 2. the UPPER WHITE triangular goes to the glue tabs directly next to it. take note - the triangle part must be on top of the two tabs. 3. the TOP MOST part (kindda looks like an arc) goes to the glue tab right next to the one you've glued earlier. 4. next, the only WHITE RECTANGLE part goes to the glue tabs directly next to it. 5. the final blue part goes to the last glue tab.
-
2010-03-24 15:26:15 |Registered| Azizan bin Yatim - part 4after settling part 5, let's take down part 4! part 4 is the cover for the nose (part 5). it's easy to do! 1. glue the bottom TRIANGULAR WHITE part to the glue tabs right next to it. make sure the triangular part stays on top. 2. part 5 will be put it INSIDE part 4. you'll figure it out - it's a no brainer! 3. glue them to the head. but do pay attention where the it goes (take a good look at the assembly pictures-see the blue section of part 5 is aligned. hope it helps! skylinezan now...time to settle my headache!
-
2010-03-24 17:34:39 |Registered| Rusty Walston - parts 4 & 5
thanks for the help...finally figured it out..I was trying to fold part 5 wrong and was just not seeing it...man are some of these parts small
-
2010-03-25 00:13:09 |Registered| Azizan bin Yatim - correctioncorrection! parts 13-27! see? that's how much of a headache I'm having!
-
2010-03-25 00:18:04 |Registered| Azizan bin Yatim - you're welcome!you're welcome! glad to be able to help out. :grin because some of the parts are microscopic, we can print it in a bigger paper (A3, perhaps?). that will save you the unnecessary eye strain! btw, if you can build parts 13-27, please share your knowledge with me. I've been trying to figure it out for almost two weeks now (on and off that is). I thank you in advance!
-
2010-03-25 15:18:42 |Registered| Rusty Walston - cheek parts
Skylinezan, I'm right with you I've gotten the parts cut out but I'm stalled once again 'big' sigh
-
2010-03-25 16:09:09 |Registered| Azizan bin Yatim - stuck with yousee? now you know what I mean right? anyways, I've sent Julian (the creator) an e-mail and hopefully we'll get our help. in the mean time, let's just wait patiently and try to look at that thing for ideas.
-
2010-04-12 01:50:48 |Registered| Stefano Lanzi - UN SALUTO DALL'ITALIA
WOW......CHE MERAVIGLIA!!!!!!
Grande Julius, hai fatto veramente un bellissimo lavoro.
Ho appena iniziato la costruzione e mi piace da impazzire!!!!
Un saluto dall'Italia e attendo con ansia tutte le altre parti....
Non ci fare aspettare ancora....
Perdonami se non parlo inglese...
CIAO da BOZA
-
2010-04-18 09:11:17 |Registered| Boris - Ïî ñáîðêåñîáðàë òàêè ãîëîâó :zzz , äëÿ ÷åãî ðàñïå÷àòàë íà ôîòîáóìàãå ïëîòíîñòüþ 120, åñëè áðàòü îáû÷íóþ ôîòîáóìàãó òî ïðè ãèáêå ìåëêèõ äåòàëåé ïðîèñõîäèò ðàññëàèâàíèå è èñïîëüçîâàë êëåé ìîìåíò êðèñòàëë!!! èíòåðåñíî ýòî òîëüêî òóëîâèùå èëè âåñü ñî âðåìåíåì áóäåò????
-
2011-03-06 01:10:05 |110.55.223.xxx| ecyrah - help meguys help me in number 13,14,15,16,17,18,19,20,21,22 how can i fit it!? or did you have a copy on how i assemble this part!!!?
-
2011-03-22 22:59:23 |220.255.2.xxx| yodaHi, i have problems with joining 34 and 35 and the rest connected to the mouth, there seems to be some solution to this problem but i cant seems to view the pictures any more can someone repost it ? Thanks alot
-
2011-03-22 23:03:22 |220.255.2.xxx| yoda1942Hi guys, Need help with part 34 and 35 how it joins together with the mouth and the rest of the pieces. There seems to be a solution but i just cant view the pictures any more, a repost of it would be greatly appreciated. Thanks all
-
2011-04-18 12:07:09 |Registered| Sakti Adjie - part no. 39 40 dan 49ada yg bisa bantu bagaimana nyambungin part 39,40 dan 49..?? klo ada pic saya akan sangat berterimakasih...^^
-
2011-05-31 06:21:05 |187.144.69.xxx| pakohola me quede impresionado con este trabajo... quiero comenzarlo pero no se que tipo de papel se utiliza... se los agradecería si me pueden decir... gracias y saludos a todos
-
2011-06-10 00:29:22 |41.135.184.xxx| Stefan Kruger - NOSE!!!How do you combine the nose with the two parts?? there is no clear descriptions...
-
2011-08-14 21:41:07 |60.53.119.xxx| simzhi, how do you actually glue up 13,14,15,16,17,18,19,20,21,22?? i dont seems to get it
| < Prev |
|---|


